Add Options Menu to Activity and Fragment
Options Menu contains a set of primary menu items that are accessible to the user. In this article, we will take a look at how to implement the options menu in an Android Activity or a Fragment.
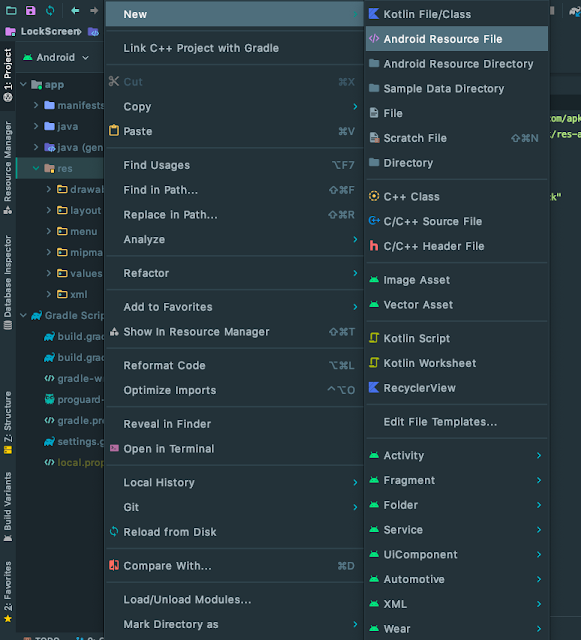
Right click on the res directory in Android Studio and select Android Resource File option. It opens the Resource File creation modal where we need to enter the file name and select Resource Type as Menu.
Clicking on OK button creates
main_menu.xml under menu directory. Now add the following items to the XML file.<menu xmlns:android="http://schemas.android.com/apk/res/android"
xmlns:app="http://schemas.android.com/apk/res-auto">
<item
android:id="@+id/search"
android:icon="@drawable/ic_search_white"
android:orderInCategory="100"
android:title="@string/action_title_search"
app:actionViewClass="androidx.appcompat.widget.SearchView"
app:showAsAction="ifRoom" />
<item
android:id="@+id/screenLockItem"
android:icon="@drawable/ic_screen_lock"
android:orderInCategory="102"
android:title="@string/menu_title_screen_lock"
app:showAsAction="ifRoom" />
<item
android:id="@+id/settings"
android:icon="@drawable/ic_settings_white"
android:orderInCategory="104"
android:title="@string/action_title_settings"
app:showAsAction="never" />
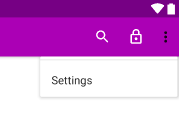
</menu>The added menu contains 3 items with title and an icon shown in the toolbar with the order specified through the
orderInCategory attribute while the showAsAction attribute is used to show the menu items as an icon or text on different screens.We need to override the
onCreateOptionsMenu method in Activity or Fragment to inflate the menu so that the items are shown to the user.Activity:
// Initialize contents of fragments options menu
override fun onCreateOptionsMenu(menu: Menu?): Boolean {
    // Inflate the menu items
    menuInflater.inflate(R.menu.main_menu, menu)
    // Return True to show the menu
    return true
}
Fragment:
// Initialize contents of fragments options menu
override fun onCreateOptionsMenu(menu: Menu, inflater: MenuInflater) {
    // Inflate the menu items
    inflater.inflate(R.menu.main_fragment_menu, menu)
}
When the application runs, users will see the menu items added on to the toolbar that belongs to the Activity but not to the Fragment. This is because fragments need to explicitly specify to the system through
setHasOptionsMenu flag that they want to populate the options menu.Fragment:
init {
    // Consider additional menu items
    setHasOptionsMenu(true)
}
The advantage of adding common menu items to the activity and specific menu items to the Fragment is that the menu items can be changed when fragments are changed while staying on the same activity or screen.
We need to override
onOptionsItemSelected method and listen to the click events of the menu items using the specified ids in Activity for the activity menu items and also in the Fragment for its menu item.// Option items are selected or clicked
override fun onOptionsItemSelected(item: MenuItem): Boolean {
when (item.itemId) {
R.id.search -> searchItems()
R.id.screenLockItem -> checkAdminActive()
R.id.settings -> showSettings()
}
return super.onOptionsItemSelected(item)
}Run the application to see the menu items in the toolbar and the click events triggering the corresponding methods.


