Posts

Showing posts from February, 2020

Use Kotlin Android Extensions to Replace findViewById

Kotlin Android Extensions is a great way to avoid writing findViewById in the activity or fragment. Simply, add the kotlin-android-extensions plugin to the module level build.gradle file. apply plugin: 'kotlin-android-extensions' Only one step to enable the feature. Now, we can remove the manual initializations. // Initialize the UI elements val constraintLayout = findViewById<ConstraintLayout>(R.id.coordinatorLayout) val responseTextView = findViewById<TextView>(R.id.responseTextView) val bottomAppBar = findViewById<BottomAppBar>(R.id.bottomAppBar) val fab = findViewById<FloatingActionButton>(R.id.fab) val productRecyclerView = findViewById<RecyclerView>(R.id.productRecyclerView) val filterButton = findViewById<Button>(R.id.filterButton) val sortButton = findViewById<Button>(R.id.sortButton) The compilers suggest us only one import to get all the synthetic properties available in the layout. If the above views are a...

Add View Binding to Replace findViewById

View Binding initializes every UI element which has an id in the layout files and exposes them to the developers through a generated class. If you think writing findViewById in every activity or fragment should not be a developer's job then you are reading the right article. Does the code inside the activity or fragment start like this? Manual UI elements initialization // Initialize the UI elements final ConstraintLayout constraintLayout = findViewById(R.id.coordinatorLayout); final TextView responseTextView = findViewById(R.id.responseTextView); final BottomAppBar bottomAppBar = findViewById(R.id.bottomAppBar); final FloatingActionButton fab = findViewById(R.id.fab); final RecyclerView productRecyclerView = findViewById(R.id.productRecyclerView); final Button filterButton = findViewById(R.id.filterButton); final Button sortButton = findViewById(R.id.sortButton); Butter Knife UI elements initialization // UI elements @BindView(R.id.coordinatorLayout) Coordinato...

How to Fetch and Save Stock Price

Historical stock prices are available on a significant number of websites to download but wouldn't it be easier to use a script to fetch these prices and save it to our local machine? In this article, we will learn how to fetch the historic stock prices of a company using Python. Let's first import the required dependencies to perform the actions. # Get the dates import datetime # Create files in the operating system import os # Convert data frames to file formats import pandas as pd # Fetch the stock prices import pandas_datareader as web # Find relative dates of the past or of the future from dateutil.relativedelta import relativedelta Now, create a StockPrice class with a helper function fetch to fetch the stock price and save function to save the stock prices to the local folder. class StockPrice: """ Provide functionality to fetch the historical stock prices and save it to a path """ def __init__(self): ...

Alert Dialog - Material Design Component

Image
Alert Dialog in Android is a blocking window shown to the user for immediate user attention and interaction. To build and show an alert dialog, we will be using MaterialAlertDialogBuilder . It is an extension of AlertDialog.Builder that we are familiar with but provides Material theming to the dialog. The below pictures shows the subtle differences in using MaterialAlertDialogBuilder and AlertDialog.Builder . Dialog built with MaterialAlertDialogBuilder Dialog built with AlertDialog.Builder Before, we start implementing the Material Alert Dialog, add Material Design Components to our project. Now, let's create the Alert Dialog. private fun showAlert(context: Context) { // Build the dialog val builder = MaterialAlertDialogBuilder(context) // Set Dialog title .setTitle(context.getString(R.string.alert_dialog_title)) // Set Dialog message .setMessage( context.getString( R.string.alert_dialo...

Add Navigation Components to the Project

Image
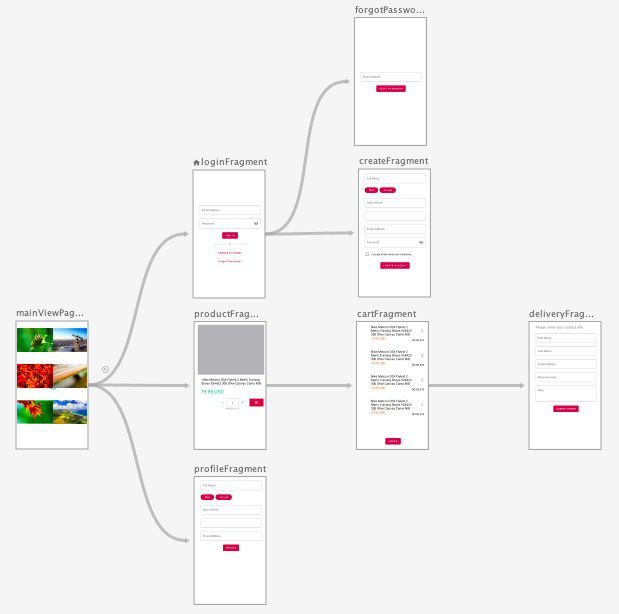
Navigation helps the users navigate inside the application between fragments and the activity. Navigation Component, on the other hand, is part of Android Jetpack and helps us (the developers) build navigation for component clicks, deep links and more. Navigation Component consists of Navigation Graph, Nav Host and the Nav Controller. We will talk about them in detail throughout the article and implement it. 1. First, add the dependencies to the module level build.gradle file. implementation 'androidx.navigation:navigation-fragment-ktx:2.2.0' implementation 'androidx.navigation:navigation-ui-ktx:2.2.0' 2. Create a Nav Host The Nav Host is a container for all the fragments to be shown on. With the help of Nav Controller, the developer can navigate the user between fragments and nested nav graphs. <fragment android:layout_width="match_parent" android:id="@+id/nav_host_fragment" app:defaultNavHost="true" a...