Posts

The Kano Method in Product Management: A Comprehensive Guide

Image
Introduction Understanding what truly delights customers is one of the biggest challenges in product management. While some features are essential, others can significantly enhance customer satisfaction or even exceed expectations. The Kano Method is a powerful prioritization framework that helps product managers classify product features based on how they impact customer satisfaction. Developed by Professor Noriaki Kano in the 1980s, this method categorizes product features into different types of customer needs—ranging from basic expectations to features that create excitement. By using the Kano model, product managers can prioritize features that maximize customer satisfaction while balancing essential functionality. In this article, we'll dive deep into the Kano Method, its categories, how to apply it, and why it’s a game-changer for product prioritization. What? The Kano Method is a customer satisfaction framework that helps product managers categorize product features based o...

The MoSCoW Method in Product Management: A Comprehensive Guide

Image
Introduction In product management, prioritization is crucial to ensure that the most valuable features and tasks are delivered efficiently. With multiple stakeholders, limited resources, and tight deadlines, product managers must decide what to focus on first. One of the most effective prioritization frameworks used in Agile development and project management is the MoSCoW method. The MoSCoW method helps teams categorize tasks and features into four priority levels—Must-Have, Should-Have, Could-Have, and Won’t-Have—allowing them to focus on what is essential while maintaining flexibility. This structured approach ensures that development teams work on the most impactful features, aligning product releases with business goals. In this article, we’ll explore the MoSCoW method, its benefits, and how to use it effectively in product management. What? The MoSCoW method is a prioritization framework that helps teams determine the importance of features, requirements, and tasks. It categoriz...

The RICE Method in Product Management: A Comprehensive Guide

Image
Introduction Determining what takes precedence is among the toughest parts of managing a product. With numerous ideas, requests, and features competing for attention, how do product managers decide what to work on next? One widely used framework for prioritization is the RICE Method, which helps teams assess and rank product initiatives based on four key factors: Reach, Impact, Confidence, and Effort. The RICE method provides a structured way to evaluate projects objectively, ensuring that resources are allocated to initiatives that deliver the highest value. This article explores the RICE scoring framework, its components, benefits, and best practices for using it effectively in product management. What? The RICE framework is a prioritization model that enables product managers to systematically evaluate different product initiatives by assigning scores based on four criteria: Reach – Number of people affected? Impact – Contribution to the overall goal? Confidence – Certainty of re...

Store Key Value Pairs Using Jetpack Data Store

One of the ways we can store information on an Android device is by using Shared Preferences. These Shared Preferences help us save key-value pairs. A newer way of saving such key-value pairs is using the Jetpack library Data Store . The Data Store library saves the key-value pairs using coroutine blocks and provides the ability to read the saved preferences using the collect function available in the Kotlin Flow. In this article, we will take a look at the Data Store class available in the Jetpack library and how to save, read the data using it. The first thing we need to do is add the dependency in the module level build.gradle file. implementation "androidx.datastore:datastore-preferences:1.0.0-alpha06" Create an instance of the Data Store using context and by passing the file name to the createDataStore function. Android creates the data store file inside a folder named datastore and this folder will be available in the app's files directory. The name passed to th...

Use Java8 APIs on Older Android Versions

Image
The less adoption of Java8 APIs in the Android Codebase is because of the lack of support on the older versions. Even though Java8 was released in 2014, it took a while for Google to resolve the issue. Existing Issue We will take an example to understand the issue in detail. Let's say we have an array list that contains countries and we need to check if the desired country is available in the list. The code to achieve it would look something like below. if (Build.VERSION.SDK_INT >= Build.VERSION_CODES.N) { // Find the country with name India val country = countryArrayList.stream().filter { it == "India" }.findFirst() if (country.isPresent) { // Country is present in the list } else { // Country is not present in the list } } else { // For loop to filter and find the item on the older version var countryPresent = false countryArrayList.forEach { if (it == "India") { // Country is present in t...

Listen to Back Button Clicks in Fragment

Listening to the back button click event inside the fragments, comprised of a painful implementation of the interfaces and the onBackPressed method calls in both Activity and Fragment, prior to the introduction of the OnBackPressedDispatcher . But now, inside a Fragment, the back button behaviour can be controlled by listening to the callback returned by the OnBackPressedDispatcher . This callback listener is implemented inside the  onCreate overridden method. override fun onCreate(savedInstanceState: Bundle?) { super.onCreate(savedInstanceState) // Listen to Back button clicks val callback = requireActivity().onBackPressedDispatcher.addCallback(this) { // Handle the back button event } } Use onBackPressedDispatcher method to get the OnBackPressedDispatcher and add the callback using the addCallback method. This callback method takes a lifecycle owner. Handle the back button events whenever the callback gets triggered. The same implementation can be d...

Run the Emulator directly in Android Studio

Image
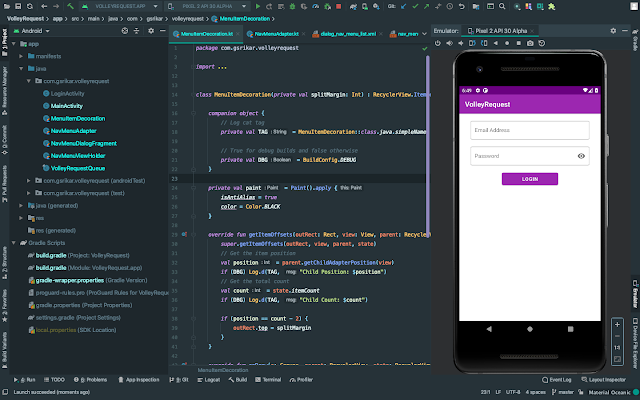
In Android Studio 4.1, a minor feature is released to reduce the screen (or window) switching between Android Studio and the Emulator. Using this feature, we can now run the Emulator directly inside the Android Studio. We can make the changes to the code and see the changes reflect in the emulator in the same window similar to layout XML and its preview. To achieve this, open the Preferences window and select the Emulator menu item under the Tools expandable menu. Here we can check the option Launch in a tool window and click OK . Now run the Emulator to see it inside the Android Studio window.